Here’s some workflow helper scripts for digital photography. A couple of assumptions are made with these scripts:
- You use OS X 10.4 – mandatory since this stuff uses Automator.
- You use Adobe DNG (version 3.2) – not mandatory, but you have to take out the dng conversion steps.
- You want your photos stored in a date hierarchy, specifically /yy/mmddyy/yyyymmdd-xxxx.dng. The xxxx is the original number from the raw file. As an example, a photo taken on Aug. 11th, 2005 would be stored in /05/081105/20050811-2927.dng.
- I use a Canon Digital Rebel, so the naming conventions are CRW_xxxx.CRW, CRW_xxxx.THM, and IMG_xxxx.JPG
I started using DNG quite a while ago. Now that the DNG converter application has command line functionality and the ability to embed full sized previews, I couldn’t be happier. I’m not professional, so take my opinions with a grain of salt, but I am fully satisfied with my photos in DNG.1
I keep my photos organized in the fashion denoted above. I have a “Photography” folder in my “Pictures” folder. Underneath “Photography” resides “DNG”, which is where all my DNG files reside in the date hierarchy. It looks like this:
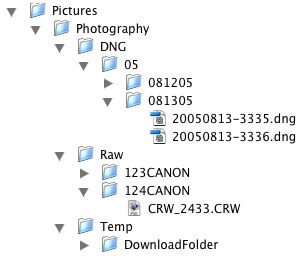
The first feature of my workflow is a Folder Action that automatically sorts photos into the appropriate year (yy) and day (mmddyy) folder in the hierarchy. If the required folders don’t exist, they are created. If the file doesn’t fit the “yyyymmdd-xxxx.dng” naming scheme, it is left alone. In my Folder Action (named “Sort to Date”), one could easily change the extension checking by adding more extensions to the extensionList property. In order to sort by different naming schemes, a bit more script hacking is required.
A folder named “Raw” also resides in the “Photography” folder. Here I keep the raw files until I burn 1 DVD backup. I typically keep them in in the xxxCANON folders found on the flash card. There is another Folder Action (named “Sort Raw Photos”) attached to the “Raw” folder that examines the raw file name and sticks it in the appropriate xxxCANON folder (ex. CRW_3214.CRW and CRW_3214.THM would both go into the “132CANON” folder).
At this point, if you manually copy files off of your flash card, manually run them through the DNG converter, and manually rename them in the above naming scheme, at the very least, you can use the two Folder Action to help you sort your photos automatically. Here’s where it starts to get a bit more complicated.
I use Unix every day as a graduate student, so I have no fear of the command line. The next tool in my tool box is the excellent ExifTool. ExifTool is a Perl module/command line application that reads and modifies EXIF, IPTC, XMP, and a whole bunch of other acronyms. It also reads a bunch of file formats. It’s also quick; I use it to rename my DNG files to my date scheme. I have a short perl script does this (ex. CRW_3214.dng -> 20050814_3214.dng). My script only reads files that are in the “Temp” directory under “Photography”. This is very easy to change if you want to store this directory somewhere else. I have this set as the output directory of the DNG converter.
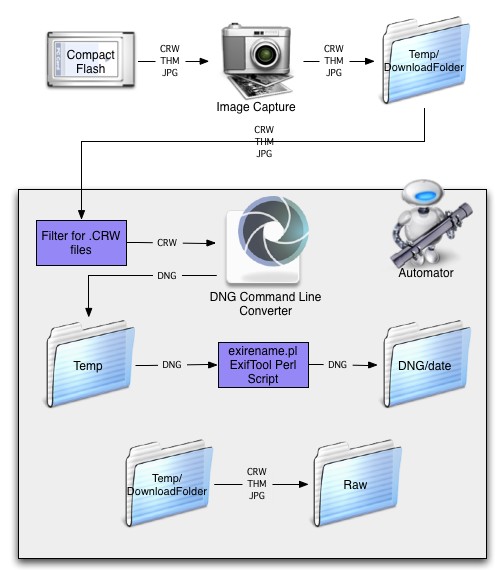
The final piece that glues this all together is Image Capture and an Automator workflow that I wrote. This workflow is diagrammed in the image below. Basically, Image Capture downloads images off your compact flash card into a directory of your choosing. I send them to “Photography/Temp/DownloadFolder”. Once they’re there, Automator picks up the files and does the following:
- Gets all the CRW files (easily changed in the workflow).
- Sends them to the DNG command line converter (set to compressed – lossless, preserve raw image, don’t embed original, and full sized preview).
- Tells exirename.pl script uses ExifTool to rename the dng files to yyyymmdd-xxxx.dng.
- Drops pictures into the “DNG” directory, where the “Sort to Date” Folder Action takes over and sorts them into the appropriate folder.
- At the end, the files in the “Temp/Download” folder are moved to the “Photography/Raw” folder where the “Sort Raw Photos” that puts these files into appropriate folders.
At this point, all of my photos have been downloaded, converted to dng, renamed, and stored in my photo directory without any extra effort. Additionally, the original raw photos are stored in another directory ready to be backed up. Everything can be downloaded here.
1 My backup routine is 1 working copy on my laptop hard drive, 1 hard drive backup, 2 DVD backups of the DNG files, and finally 1 DVD backup of the original raw files.
Wow… impressive.
Yeah Thom. I didn’t really post this so you guys would know how I’ve been managing photos. I’ve been posting in some digital photography forums and thought I would share what I’ve done. By putting up a post here, I have a place I can point people to so they can see my method.
I was gonna say, it looks impressive but I have no idea what you’re talking about. I just drag my photos from the camera to a folder on the hard-drive without changing the format. If I need to send them to other folks I make a copy and give it some sort of meaningful file name.
With all this converting file formats and making three backup coppies you sound pretty hard core man.
Kind of like a geometry proof!
Thank you for making this. It will be a good starting point for me.